|
|
7 years ago | |
|---|---|---|
| .vscode | 7 years ago | |
| css | 7 years ago | |
| html | 7 years ago | |
| include | 7 years ago | |
| js | 7 years ago | |
| lib | 7 years ago | |
| pictures | 7 years ago | |
| src | 7 years ago | |
| svg | 7 years ago | |
| test | 7 years ago | |
| .DS_Store | 7 years ago | |
| .gitignore | 7 years ago | |
| .travis.yml | 7 years ago | |
| README.md | 7 years ago | |
| platformio.ini | 7 years ago | |
| processHtml.py | 7 years ago | |
README.md
Tonuino based on ESP32 with I2S-DAC-support
Disclaimer
This is a fork of the popular Tonuino-project which means, that it only shares the basic concept of controlling a music-player by RFID-tags and buttons. Said this I want to rule out, that the code-basis is completely different. So there might be features, that are supported by my fork whereas others are missing or implemented different. For sure both share that it's non-profit, DIY and developed on Arduino.
What's different (basically)?
The original project makes use of microcontrollers (uC) like Arduino nano (which is the Microchip AVR-platform behind the scenes). Music-decoding is done in hardware using DFPlayer mini which offers a uSD-card-slot and an integrated amp as well. Control of this unit is done by a serial-interconnect with a uC using the API provided.
The core of my implementation is based on the popular ESP32 by Espressif. Having WiFi-support out-of-the-box makes it possible to provide further features like an integrated FTP-server (to feed the player with music), smarthome-integration via MQTT and webradio. However, my primary facous was to port the project to a modular base. Said this mp3-decoding is done in software with a dedicated uSD-card-slot and music-output is done via I2S-protocol. I did all my tests on Adafruit's MAX98357A. Hopefully, not only in theory, other DACs can be used as well.
Basic concept/handling
The basic idea of Tonuino (and my fork, respectively) is to provide a way, to use the Arduino-platform for a music-control-concept that supports locally stored music-files instead of being fully cloud-dependend. This basically means that RFID-tags are used to direct a music-player. Even for kids this concept is simple: place an RFID-object (card, character) on top of a box and the music starts to play. Place another RFID-object on it and anything else is played. Simple as that.
Hardware-setup
The heart of my project is an ESP32 on a development-board that more or less looks like this. If ordered in China (Aliexpress, eBay e.g.) it's pretty cheap (around 4€) but even in Europe it's only around 8€. Make sure to install the drivers for the USB/Serial-chip (CP2102 e.g.). If unsure have a look at eBay for "ESP32S" or "Lolin 32".
- Adafruit's MAX98357A
- uSD-card-reader
- RFID-reader
- RFID-tags
- Neopixel-ring
- Rotary Encoder
- Buttons
- Speaker
- uSD-card: doesn't have to be a super-fast one; uC is limiting the throughput. Tested 32GB without any problems.
Most of them can be ordered cheaper directly in China. It's just a give an short impression of the hardware; feel free to order where ever you want to. I don't earn money with my links.
Getting Started
I recommend Microsoft's Visual Studio Code alongside with Platformio Plugin Since my project on Github contains platformio.ini, libraries used should be fetched automatically. Please note: if you use another ESP32-develboard (Lolin32 e.g.) you might have to change "env:" in platformio.ini to the corresponding value. Documentation can be found here. After that it might be necessary to adjust the names of the GPIO-pins in the upper #define-section of my code. In the upper section of main.cpp you can specify the modules that should be compiled into the code. Please note: if MQTT is enabled it's still possible to deactivate it via webgui.
Wiring
A lot of wiring is necessary to get ESP32-Tonuino working. After my first experients I soldered the stuff on a board in order to avoid wild-west-cabling. Especially for the interconnect between uC and uSD-card-reader make sure to use short wires (like 10cm or so)!
| ESP32 (GPIO) | Hardware | Pin | Comment |
|---|---|---|---|
| 5 V | SD-reader | VCC | Connect to p-channel MOSFET for power-saving when uC is off |
| GND | SD-reader | GND | |
| 15 | SD-reader | CS | |
| 13 | SD-reader | MOSI | |
| 16 | SD-reader | MISO | |
| 14 | SD-reader | SCK | |
| 17 | RFID-reader | 3.3V | Connect directly to GPIO 17 for power-saving when uC is off |
| GND | RFID-reader | GND | |
| 22 | RFID-reader | RST | |
| 21 | RFID-reader | CS | |
| 23 | RFID-reader | MOSI | |
| 19 | RFID-reader | MISO | |
| 18 | RFID-reader | SCK | |
| 5 V | MAX98357 | VIN | Connect to p-channel MOSFET for power-saving when uC is off |
| GND | MAX98357 | GND | |
| 25 | MAX98357 | DIN | |
| 27 | MAX98357 | BCLK | |
| 26 | MAX98357 | LRC | |
| 34 | Rotary encoder | CLR | |
| 35 | Rotary encoder | DT | |
| 32 | Rotary encoder | BUTTON | |
| 3.3 V | Rotary encoder | + | |
| GND | Rotary encoder | GND | |
| 4 | Button (next) | ||
| GND | Button (next) | ||
| 33 | Button (previous) | ||
| GND | Button (previous) | ||
| 5 | Button (pause/play) | ||
| GND | Button (pause/play) | ||
| 5 V | Neopixel | 5 V | Connect to p-channel MOSFET for power-saving when uC is off |
| GND | Neopixel | GND | |
| 12 | Neopixel | DI | Might be necessary to use a logic-converter 3.3 => 5V |
| 17 | (e.g.) BC337 (via R5) | Base | Don't forget R5! |
Optionally, GPIO 17 can be used to drive a NPN-transistor (BC337-40) that pulls a p-channel MOSFET (IRF9520) to GND in order to switch on/off 5V-current. Transistor-circuit is described here: Just have a look at Abb. 4. Values of the resistors I used: R1: 10k, R2: omitted(!), R4: 10k, R5: 4,7k
Prerequisites
- choose if optional modules (MQTT, FTP, Neopixel) should be compiled/enabled
- for debugging-purposes serialDebug can be set to ERROR, NOTICE, INFO or DEBUG.
- make decision, if MQTT should be enabled (enableMqtt)
- if yes, set the IP of the MQTT-server accordingly and check the MQTT-topics (states and commands)
- in setup() RFID-cards can be statically linked to an action/file. Everything is stored in uC's NVS.
- if Neopixel enabled: set NUM_LEDS to the LED-number of your Neopixel-ring and define the Neopixel-type using
#define CHIPSET - please note: by using audiobook-mode any playlist-savings will be overwritten with every start unless the RFID-cards in setup() are commented out. Main way to link RFID to an action will be a webservice (still under development)
- If you're using Arduino-IDE please make sure to change ESP32's partition-layout to
No OTA (2MB APP/2MB Spiffs)as otherwise the sketch won't fit into the flash-memory. - compile and upload the sketch
Starting Tonuino-ESP32 first time
After plugging in it takes a few seconds until neopixel indicates that Tonuino is ready (by four (slow) rotating LEDs). If uC was not able to connect to WiFi, an access-point (named Tonuino) is opened and after connecting this WiFi, a configuration-Interface is available. Enter WiFI-credentials, save them and restart the uC. Then reconnect to your "regular" WiFi. Now you're ready to got: place your favourite RFID-tag next to the RFID-reader and the music should start to play. While the playlist is generated, fast-rotating LEDs are shown. The more tracks a playlist/directory contains the longer this step takes.
After Tonuino-ESP32 is connected to your WiFi
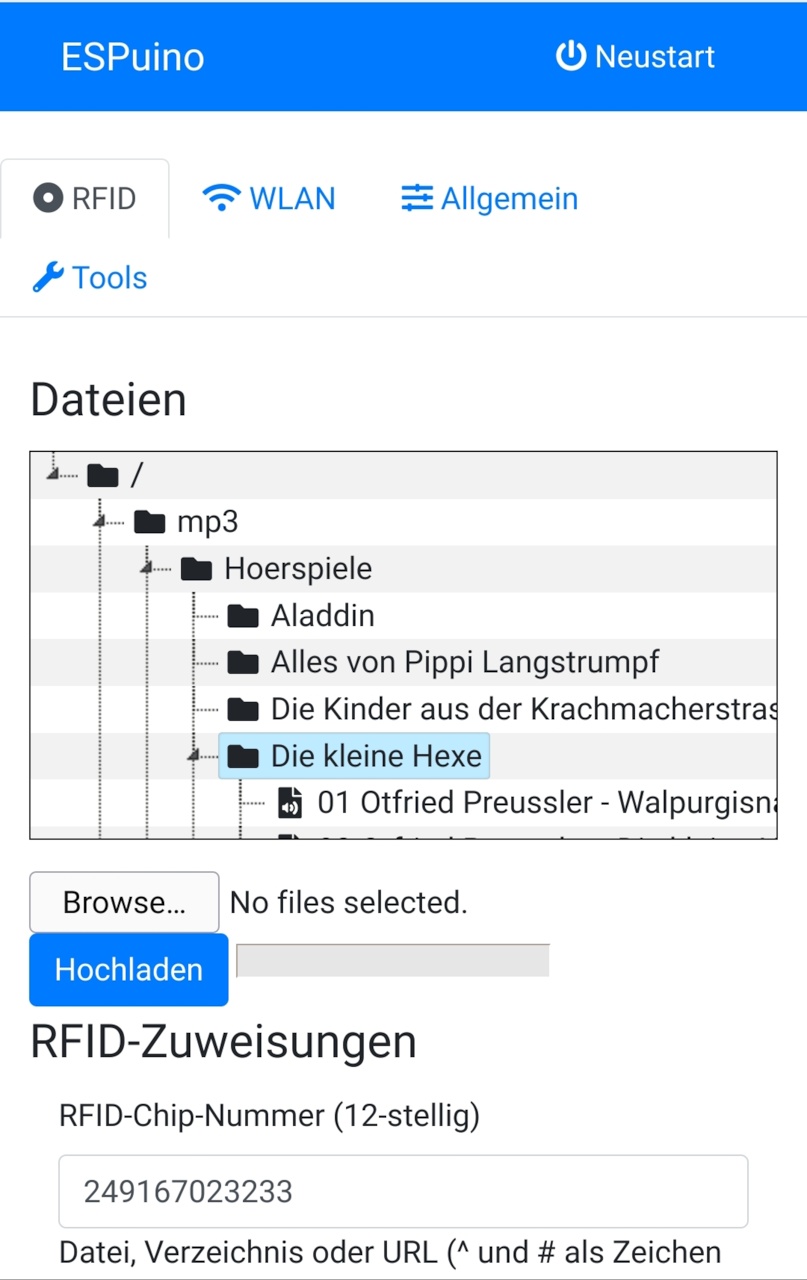
After connecting the Tonuino to your WiFi, the 'regular' Webgui is available at the IP assigned by the router. Using this GUI, you can configure:
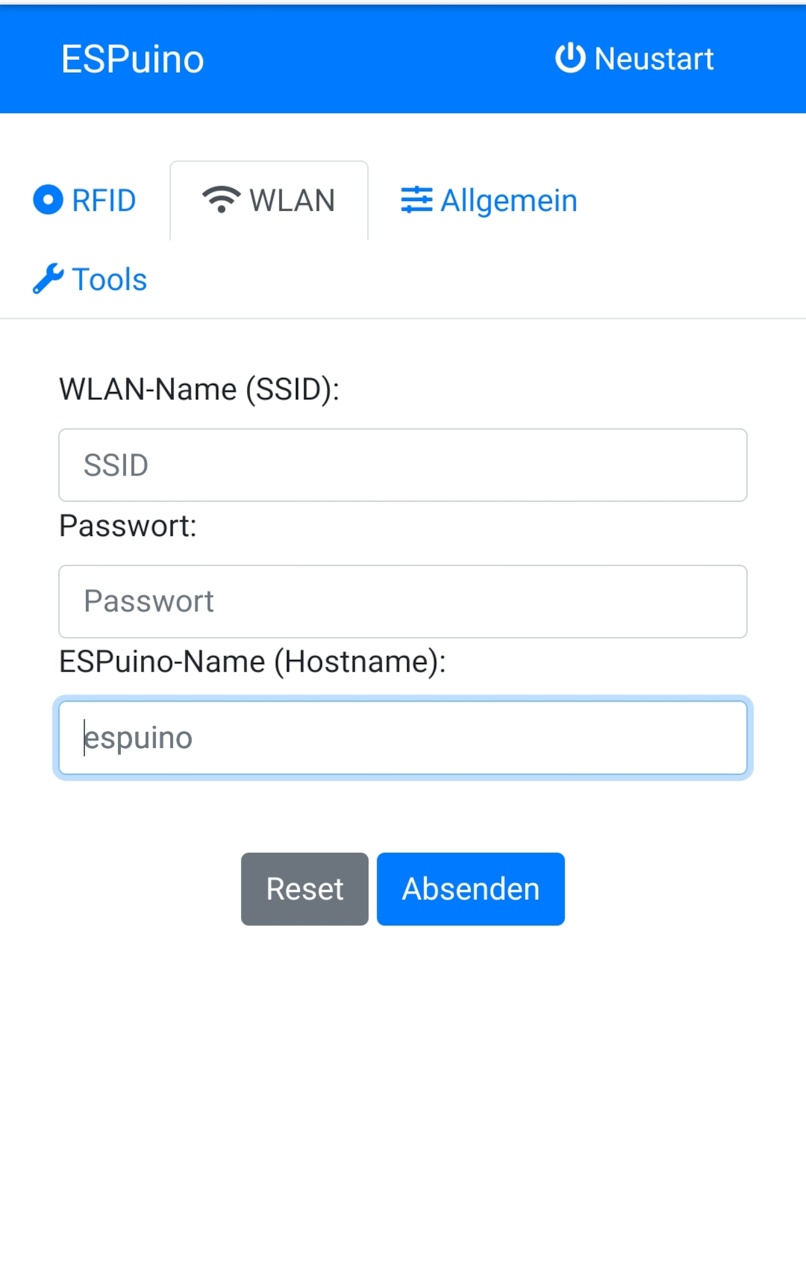
- WiFi
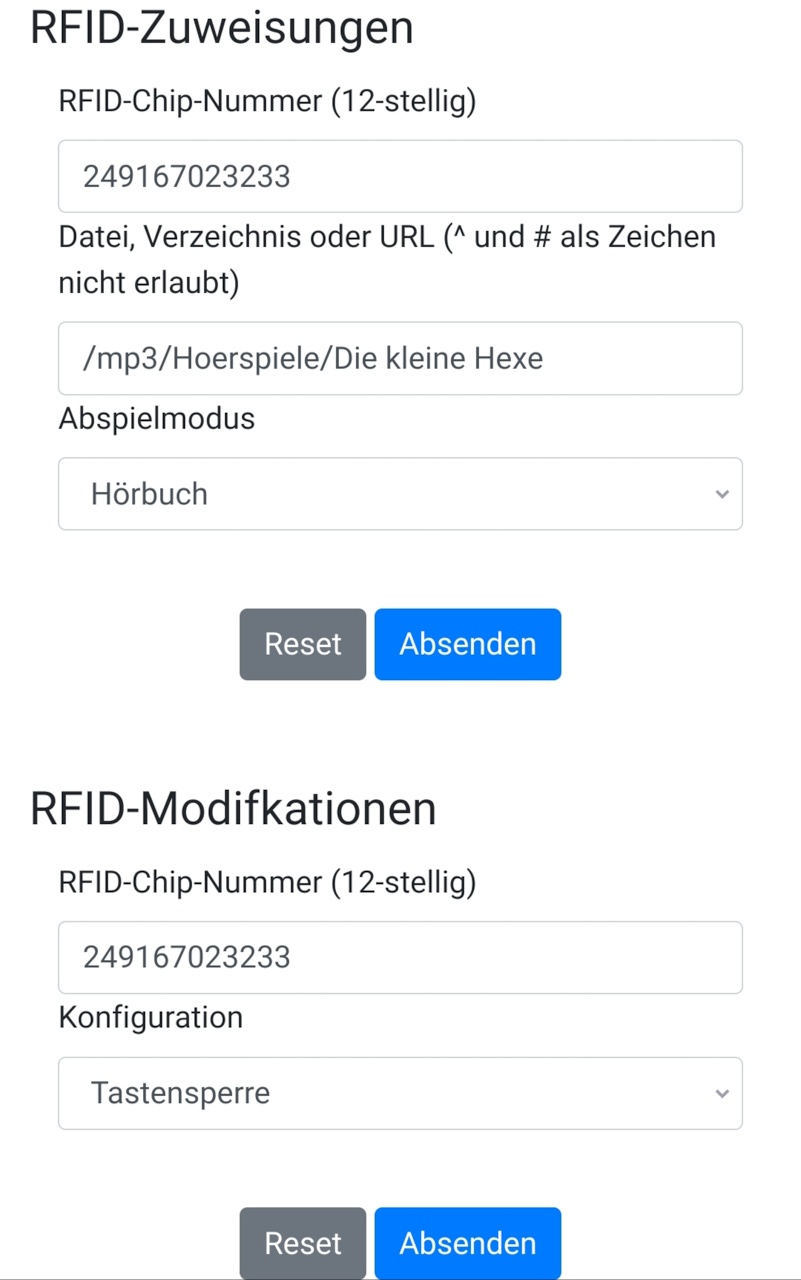
- Binding between RFID-tag, file/directory/URL and playMode
- Binding between RFID-tag and a modification-type
- MQTT
- FTP
- Initial volume, maximum volume, brightness of Neopixel and inactivity-time
Webgui #1:
Webgui #2:
Webgui #3:
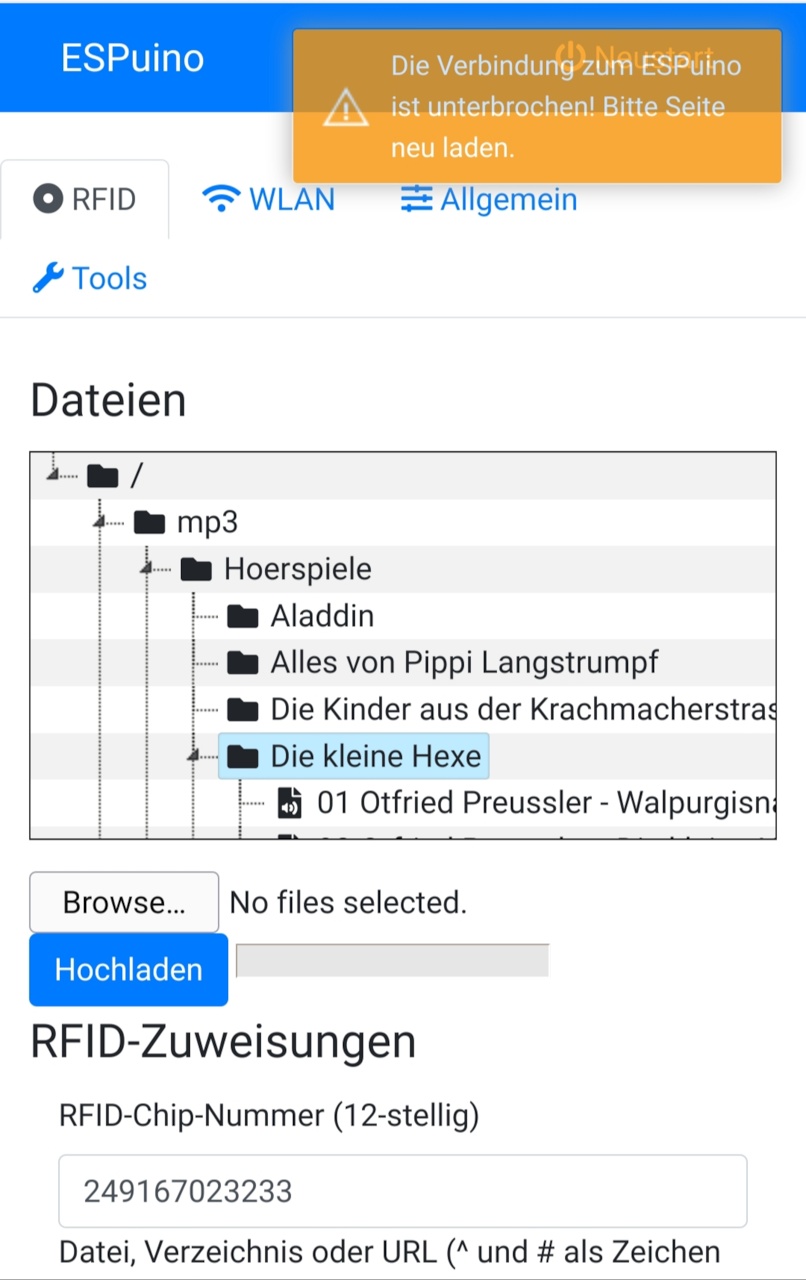
Webgui: websocket broken:
Webgui: action ok:
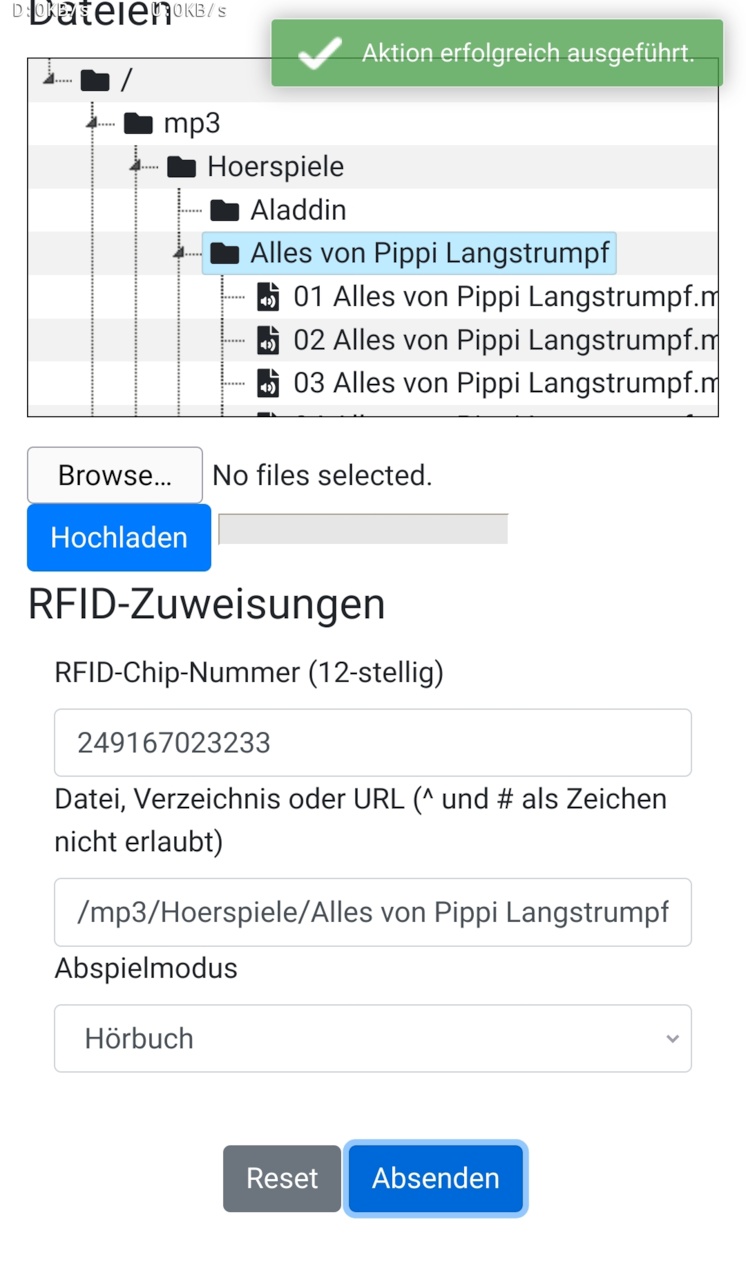
Please note: as you apply a RFID-tag to the RFID-reader, the corresponding ID is pushed to the GUI (and flashes a few times; so you can't miss it). So there's no need to enter such IDs manually (unless you want to).
Interacting with Tonuino
Playmodes
It's not just simply playing music; different playmodes are supported:
- single track
- single track (loop)
- audiobook (single file or playlist; last play-position (file and playlist) is saved and re-used next time)
- audiobook (loop)
- folder/playlist (alph. sorted)
- folder/playlist (random order)
- folder/playlist (alph. sorted) as loop
- folder/playlist (random order) as loop
- webradio (always only one "track")
Modification RFID-tags
There are special RFID-tags, that don't start music by themself but can modify things. If applied a second time, it's previous action will be reversed. Please note: all sleep-modes do dimming automatically because it's supposed to be used in the evening when going to bed. Well, at least that's my children's indication :-) So first make sure to start the music then use a modification-card in order to apply your desired modification:
- lock/unlock all buttons
- sleep after 5/30/60/120 minutes
- sleep after end of current track
- sleep after end of playlist
- sleep after five tracks
- dimm neopixel
- current track in loop-mode (is "stronger" than playlist-loop but doesn't overwrite it!)
- playlist in loop-mode
- track und playlist loop-mode can both be activated at the same time, but unless track-loop isn't deactivated, playlist-loop won't be effective
Neopixel-ring (optional)
Indicates different things. Don't forget setting number of LEDs via #define NUM_LEDS
- IDLE: four LEDs slow rotating
- ERROR: all LEDs flashing red (1x)
- OK: all LEDs flashing green (1x)
- BUSY: violet; four fast rotating LEDs
- track-progress: rainbow; number of LEDs relative to play-progress
- playlist-progress: blue; appears only shortly in playlist-mode with every new track; number of LEDs relative to progress
- volume: green => red-gradient; number of LEDs relative from actual to max volume
- switching off: red; circle that grows until long-press-time is reached
- buttons locked: track-progress-LEDs coloured red
- paused: track-progress-LEDs coloured orange
- rewind: if single-track-loop is activated a LED-rewind is performed when restarting the given track
Buttons
Some buttons have different actions if pressed long or short. Minimum duration for long press in ms is defined by intervalToLongPress.
- previous (short): previous track / beginning of the first track if pressed while first track is playing
- previous (long): first track of playlist
- next (short): next track of playlist
- next (long): last track of playlist
- pause/play (short/long): pause/play
- rotary encoder (turning): vol +/-
- rotary encoder (button long): switch off (only when on)
- rotary encoder (button short): switch on (only when off)
Music-play
- music starts to play right after valid RFID-tag was applied
- if a folder should be played that contains many mp3s, the playlist generation can take a few seconds. Please note that a file's name including path cannot exceed 255 characters.
- while playlist is generated Neopixel indicates BUSY-mode
- after last track was played, Neopixel indicates IDLE-mode
- in audiobook-mode, last play-position is remembered (position in actual file and number of track, respectively)
Audiobook-mode
This mode is different from the other ones because the last playposition is saved. Playposition is saved when...
- next track starts
- first/previous/last track requested by button
- pause was pressed
- playlist is over (playposition is set back to the first track and file-position 0)
Webinterface-configuration
Todo; currently under development. Will make it possible to assign actions/files/folders to RFID-tags and configure some things.
FTP (optional)
In order to avoid exposing uSD-card or disassembling the Tonuino all the time for adding new music, it's possible to transfer music onto the uSD-card using FTP. Please make sure to set the max. number of parallel connections to ONE in your FTP-client. My recommendation is Filezilla. But don't expect fast transfer, it's only around 145 kB/s and decreases dramatically, if music is played in parallel. Better stop playback then doing a FTP-transfer. Default-user and password are set via ftpUser and ftpPassword.
Energy saving
As already described in the modify-section, there are different sleepmodes available. Additionaly uC will be put into deepsleep after 10 minutes of inactivity (configurable my maxInactivityTime) unless Tonuino doesn't play music, has a FTP-client connected and any input via buttons. Every button-interaction resets the counter to the initial value.
MQTT (optional)
Everything that can be controlled via RFID-tags and buttons, can also be controlled via MQTT. All manual interactions (buttons, RFID-tags) are also sent to MQTT in parallel, so everything is always in-sync (unless Wifi/MQTT-connection is broken). In my home-setup I'm using openHAB to encapsulate MQTT into a nice GUI, that's accessible via APP + web. ToDo: Publish sample-configurations for openHAB.
Supported file/stream-types
Please refer ESP32-audioI2S, as this is the library I used for music-decoding.
Smarthome (optional)
As already described, MQTT is supported. In order to use it it's necessary to run a MQTT-broker; Mosquitto for instance. After connecting to it, Tonuino subscribes to all command-topics. State-topics are used to push states to the broker in order to inform others if anything changed (change of volume, new playlist, new track... name it). Others, like openHAB, subscribe to state-topics end send commands via command-topics. So it's not just limited to openHAB. It's just necessary to use a platform, that supports MQTT.